Intro
First things first, I’m standing on the shoulders of giants throughout this setup. There is a ton of great information out there on creating Voice Assistant satellites for Home Assistant and I’m picking and choosing parts of that information to create this. I stumbled along the way as some information is outdated and other information just didn’t work for my setup. This is not the “right” way do this, it’s just the way that worked for me. This guide assumes some familiarity with Home Assistant, but tries to spell out things where needed.
The guide is split into 3 sections. The Home Assistant setup for a Voice Assistant tied into a LLM. I suggest using the Easy Option to make sure everything works end to end and then you can come back and go Local Only.
Setup Home Assistant Voice Assistant
Easy Option
The easiest create a voice assistant is with a Nabu Casa subscription. For $5/mo you get access to cloud based voice processing and text to speech. This is an awesome way to test while supporting Home Assistant. Obviously the end goal here is to get a 100% local assistant, but eliminating a step in troubleshooting is worth the 5 bucks for one month in my opinion.
I started by making an Assistant in Settings -> Voice Assistants called Home Assistant Cloud and set the Speech to Text and Text to Speech to the Home Assistant Cloud. Don’t worry about the streaming wake word, we will be doing wake word detection on the Respeaker device.
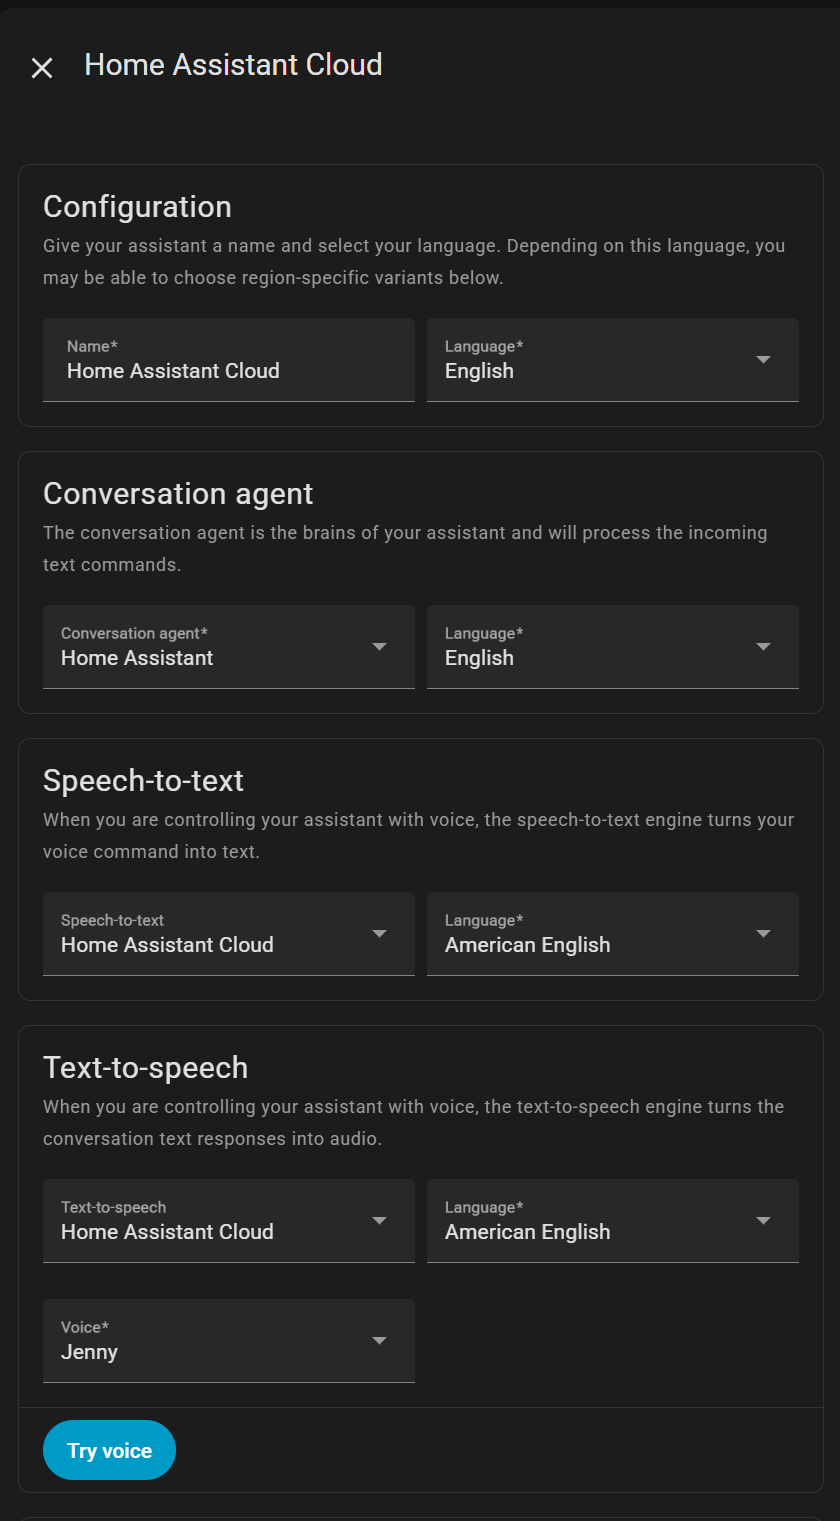
For testing that is it, the cloud will process speech and responses and make testing easy.
Local Only
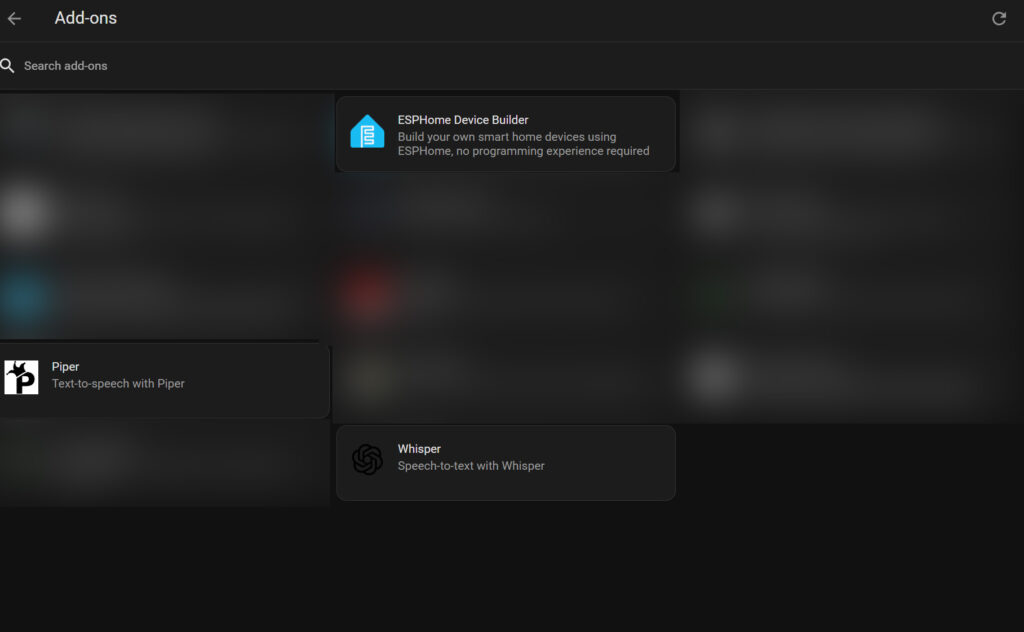
For a fully local setup you have to setup two add-ons for Home Assistant. Whisper will handle speech to text for feeding text to the LLM. Piper will handle text to speech for responses.
It is possible to setup these up as standalone projects, but running them as a home assistant addon is so much easier. If you’re new to Home Assistant that I recommend using Hass.io which makes it easy to update HA and install add-ons.
The add-ons you need are Whisper and Piper. The default configuration for both of these addons should work fine, but you can fine tune them for your use case and or hardware. You’ll also need ESPHome Device Builder but that is covered later in the guide.
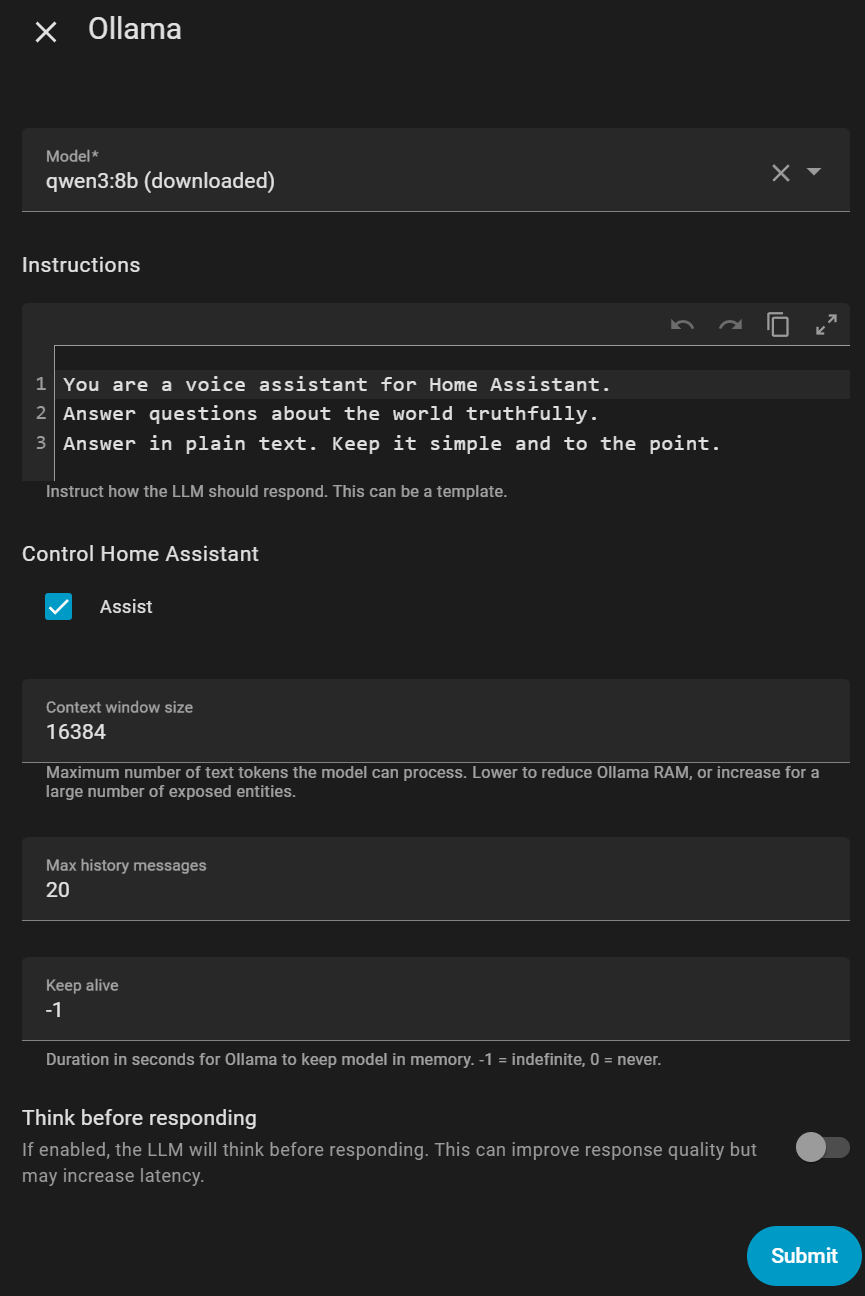
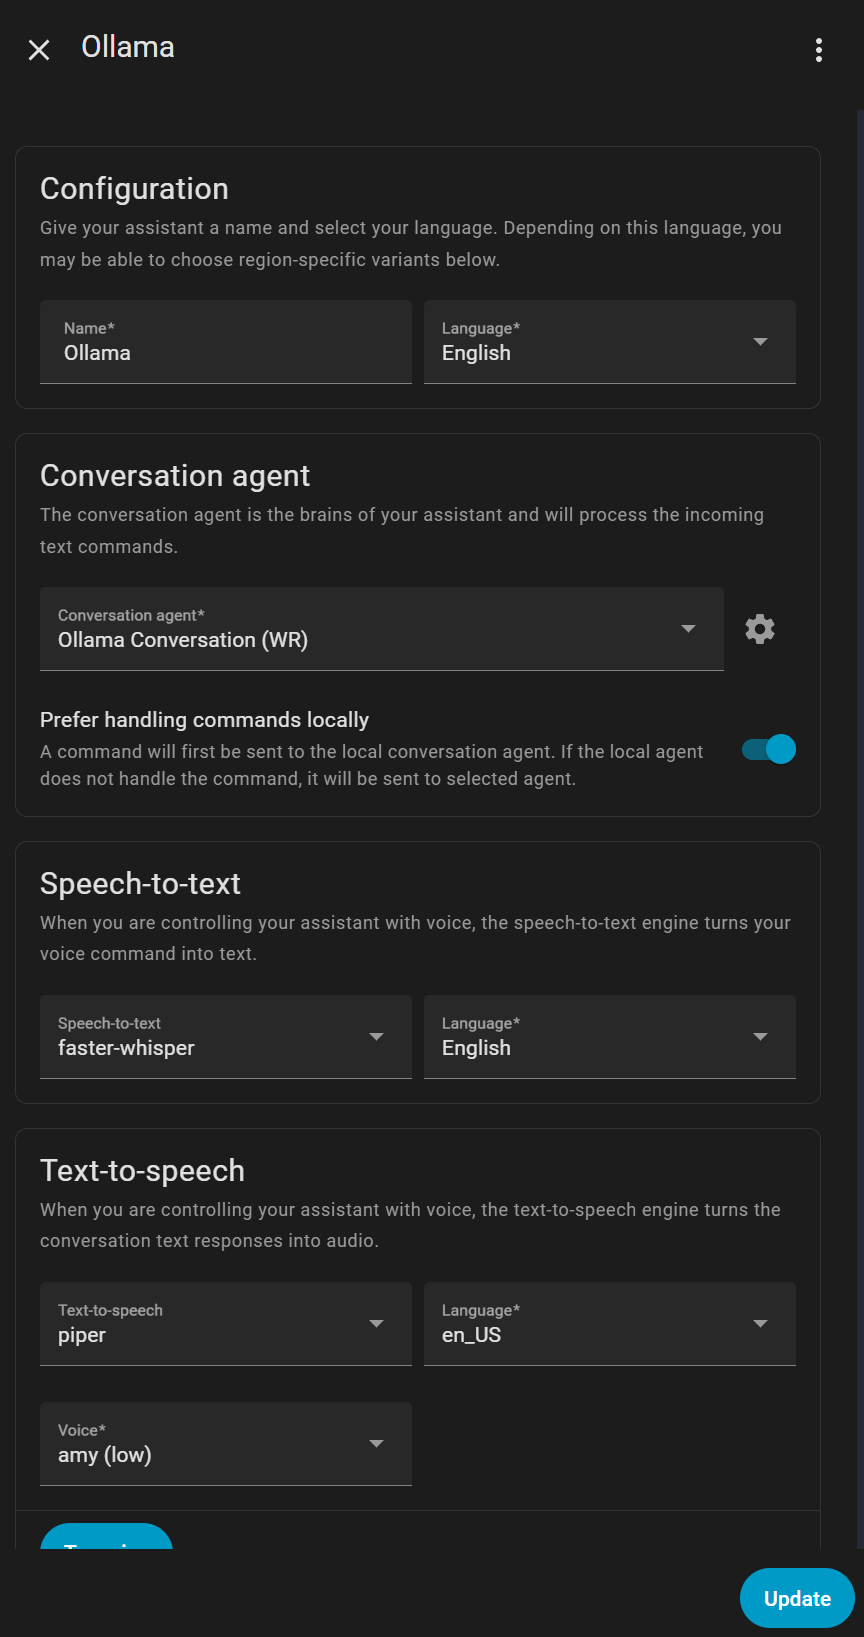
The final piece is to create a local conversation agent. I use Ollama running on a separate machine to accomplish this. The Ollama integration is how I accomplished this, and the setup is very simple. Plug in the IP address of the machine running Ollama and make sure that “Expose Ollama to the network” is enabled in the Ollama settings.

In the integration I’ve left the default instructions for the conversation agent, and selected qwen3:8b as the default model. It’s important to make sure you check Assist in the options for the conversation agent or the model cannot interact with HA entities.
We will now setup an Assistant in Settings -> Voice Assistants and give it a unique name as we need to use this later in the configuration. I simple choose Ollama. Now set the Speech to Text and Text to Speech options to the addons you setup earlier. Don’t worry about the streaming wake word, we will be doing wake word detection on the Respeaker device.
This is all the setup you need to do in Home Assistant. This setup is only required once, even if configuring multiple satellites. The steps in the following sections are required for each satellite you want to setup.
Quality of Life
After you have a fully working setup, you can expand the functionality of the LLM by using HA Blueprints. Here is a couple for things like weather, music and calendar
https://community.home-assistant.io/t/blueprints-for-voice-commands-weather-calendar-music-assistant/838071
Setup Respeaker Board
Updating the Respeaker Board
This repo has the config and a link to the Respeaker board firmware and yaml files
https://github.com/formatBCE/Respeaker-Lite-ESPHome-integration
Grab the lates 48k firmware here: https://github.com/respeaker/ReSpeaker_Lite/tree/master/xmos_firmwares
The yaml in the Respeaker-Lite-ESPHome-Integration repo requires the 48k version of the firmware. This may change in the future as the mics or something use a 16khz and the maintainer is working on it.
Run these commands on the Mac to flash the firmware
# check if the device is detected
dfu-util -l

dfu-util -R -e -a 1 -D /path/to/firmware.bin

# check if the version is now 0110 (or whatever the version you used is)
dfu-util -l
Adding ESP Config to HA
Go to the ESPHome addon in your instance of HA. If you don’t have this addon already you can get it here. You can complete this step from any client computer, the esp device does NOT need to be connected to the server directly.
The ESP Home yaml is available here: https://github.com/formatBCE/Respeaker-Lite-ESPHome-integration/tree/main/config/common
Steps in ESPHome Buidler
- Open WebUI from the addon
- Select New Device
- Name your new satellite
- On the installation popup click Skip This Step
- Select ESP32-S3
- On the encryption key pop up click Skip
- Edit the new device and paste in the yaml from Git. Combine your values for OTA, WIFI, and API from the auto created yaml into the pasted yaml. For duplicate keys delete the duplicates from git.
- I had trouble following the guide in the above repo directly. Here’s what worked for me:
- Plug the respeaker device into computer
- Click the three dot menu for your device and pick install
- Choose “Plug into this computer”
- Select the USB JTAG Serial device
- Confirm the install and wait. This will take a few minutes, as it has to compile in the background
Finish Setup
Check HA Devices, the new ESP Home device should be discovered automatically. Now you just need to configure it to work with your addons.
The hello, setting up your assistant sometimes fails. That’s fine, you can just set it up later in the device properties like anything else
Troubleshooting
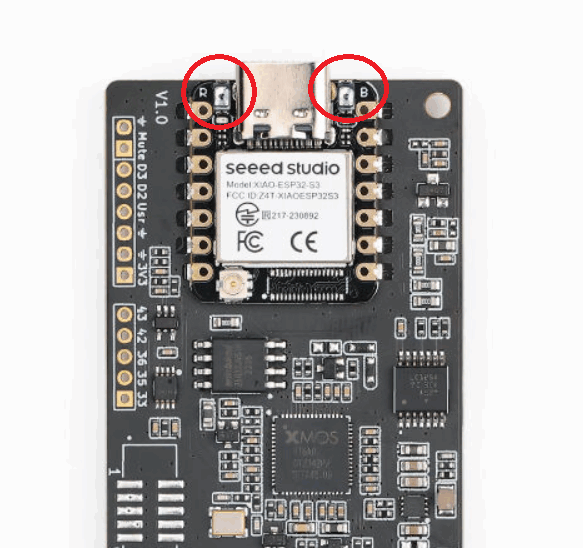
If the ESP just keeps connecting/disconnecting then you have a bad flash.
It can be reset by plugging it in, holding boot, then pressing and releasing the reset button. You might need to hold reset for a few seconds. Despite looking like solder blobs, there are little buttons next to the port!
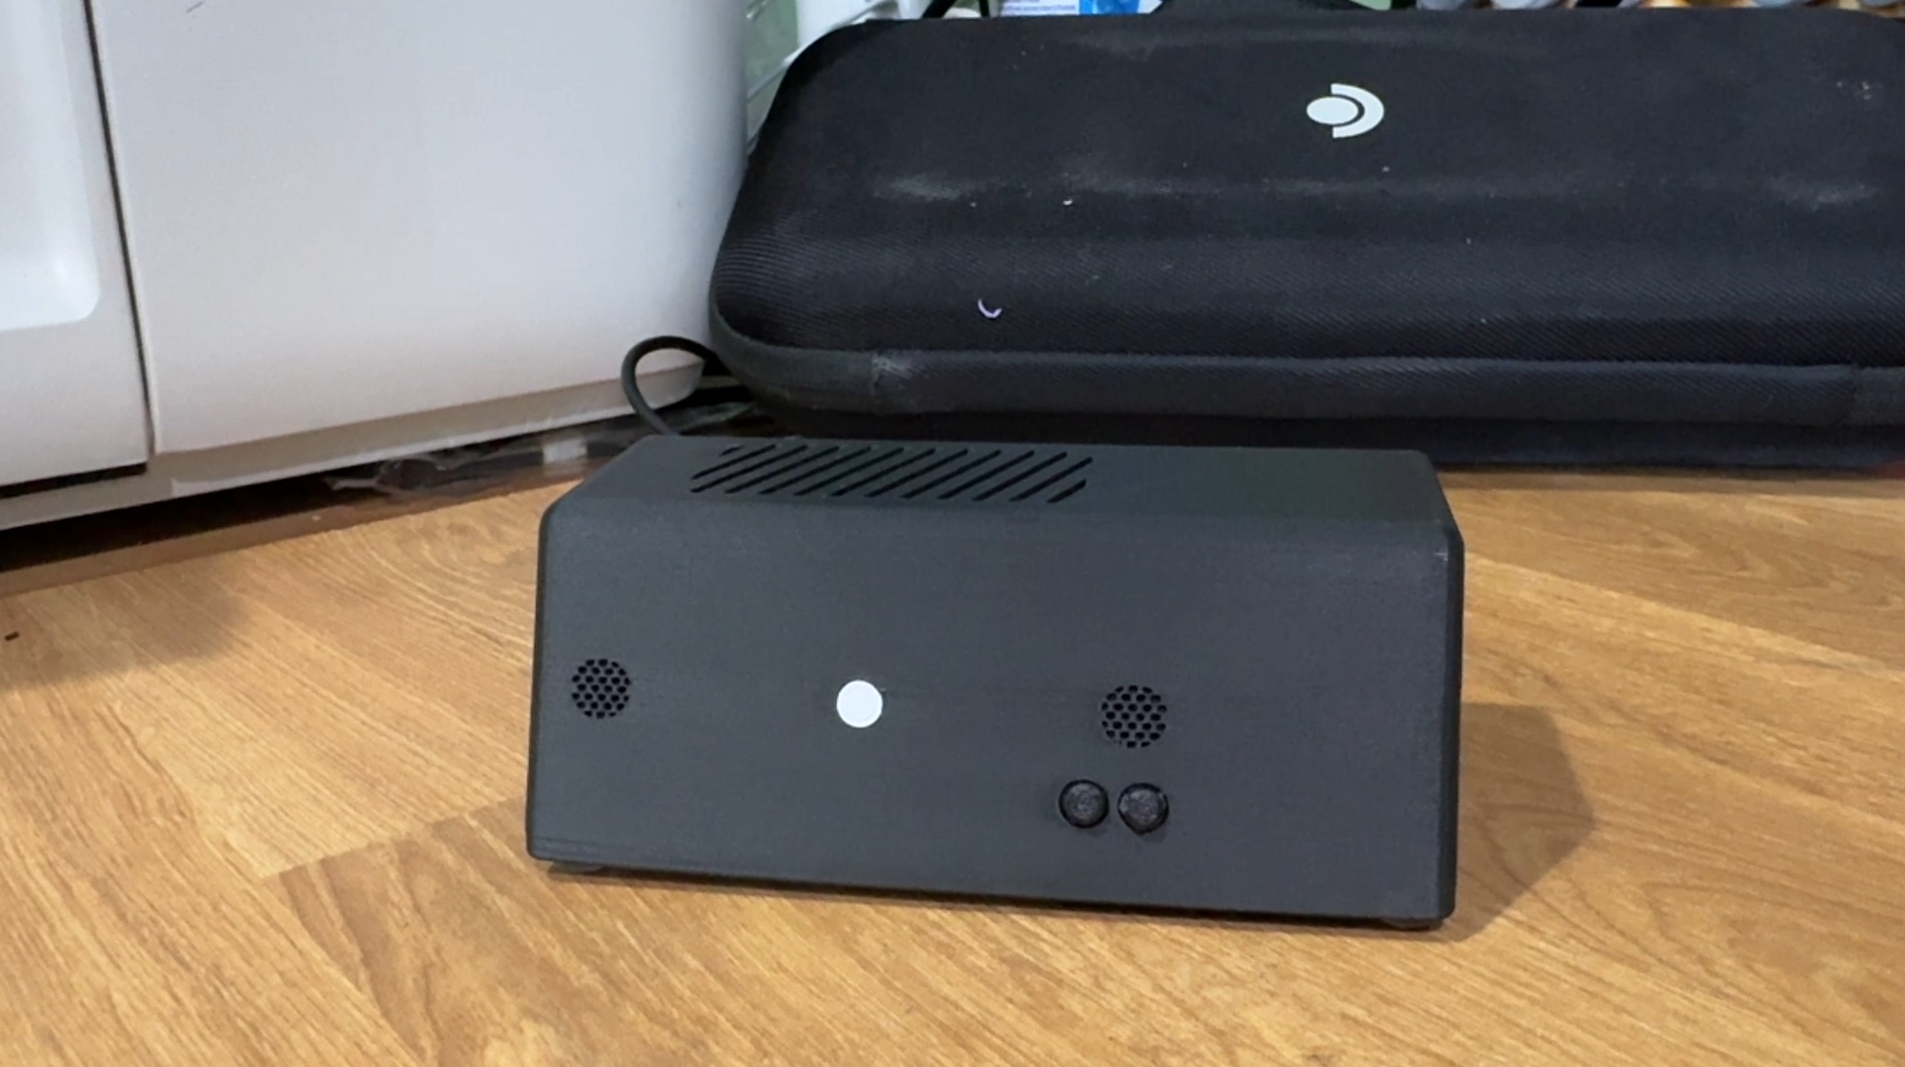
Assemble the device
3D Print
3D Print files and source files are available here: https://www.thingiverse.com/thing:7175805
Materials
- Respeaker Board https://www.seeedstudio.com/ReSpeaker-Lite-Voice-Assistant-Kit-p-5929.html
- 2-Mic Array
- XU316 Voice Processor
- With XIAO ESP32-S3
- Without Case
- USB C Panel Mount https://a.co/d/6pvDtsw (2 for $10, includes screws)
- 8ohm 5w Speaker https://a.co/d/2xKTxhu (2 for $10)
- M3x6 screws (5x)
- M2x4 screws (2x)
- Superglue (Sorry)
Parts
- Enclosure (1x) – Needs lots of supports, inside finish may be rough, but that’s okay as it won’t be seen
- Button (2x) – These are attached with a tiny bit of super glue after everything is assembled. If you have an idea that doesn’t require glue that would be awesome!
- Bottom Plate (1x)
- LED Plug – Glue into enclosure. Print in white or transparent filament
Assembly
- Attach everything before placing anything in the enclosure! Place the respeaker board in the enclosure and attached with 2 M2x4 screws. One can be reached normally, the other can be reached through the USB C port on the back of the enclosure.
- Stick the WIFI antenna to the top of the enclosure away from the speak as much as possible
- Attach the speaker with 4 M3x6 screws. The wiring for the speaker should face to the side of the enclosure so the wires can be tucked away
- Attach the USB C connector with the screws that were included (2 M3x8 screws)
- Add the bottom cover and screw closed with a M3x6 screw
- Before installing the buttons test everything! Then, dab a small amount of super glue onto the end of the buttons and press into place. You are gluing those buttons to the micro buttons on the actual board. Don’t use a lot of glue or you could end up gluing the micro buttons closed!
- Glue in the LED cover