Have you seen Part 1 and Part 2 of this saga of learning how to train a Stable Diffusion model locally? If not, there may be some gaps in what I explain here, but I will give as much context as needed in this post. If you want the full background of how I made it to this point and gotchas to avoid, I suggest reading those posts first. I’ll be going into detail on each line of the code I share. If you’re a lifelong Python dev or familiar with ML training already then much of this will be over explained. If you want to skip all this and don’t care about running the tools locally I suggest using this Google Colab Notebook, but it is always more fun to piece everything together yourself!
Setting up your environment
There are a few different diffuser repos out there to choose from, I’m using the Hugging Face diffuser which many of the others are forked from. Really what we’re looking for is the DreamBooth example directory as we’ll be using the script in there to generate our model. First things first, we need to clone that repo.
git clone https://github.com/huggingface/diffusers.gitBefore we do anything else we’re going to install Anaconda. We’ll be using this to manage our virtual environment for Python and to download some of the dependencies we need. There are other options out there and if you’re more comfortable with those it doesn’t make a difference, but what you don’t want to do is skip this! If you want to try out other diffuser repos in the future not having a virtual environment will make it terribly hard to manage dependencies. Anaconda can be installed using their install script found here. As of today that looks like this.
wget https://repo.anaconda.com/archive/Anaconda3-2022.05-Linux-x86_64.sh
# You should check the contents of this or the hash! Downloading and executing is a script is dangerous!
bash Anaconda3-2022.05-Linux-x86_64.sh
# Use default for location, when prompted to run conda init, choose 'yes'
# reload your shell or run this to reflect the changes
source ~/.bashrc
# your prompt should now start with (base)
Once Anaconda is installed, your prompt should now have (base) in front of it. The name in parentheses is giving your the current conda environment your shell is using. Base is the default, but we don’t want to pollute that environment, so lets make our own. You can choose any name you’d like, but for my examples I’ll be using hdb for “Huggingface DreamBooth.” Another handy feature is the ability to pass in an environment.yml file or a requirements.txt file. In this case though Conda cannot resolve the transformers or accelerate requirements so we’re going to do that manually. Additionally, we want to specify our Python version when creating the environment.
conda create -n hdb python=3.9
conda activate hdb
At this point your prompt should now start with (hdb) showing that you are using your newly created virtual environment. With the environment created we can move on to installing our dependencies. For some of these dependencies we’ll be using the conda-forge channel, which is a community maintained packages. Given that all the dependencies we are installing are Python libraries we could use pip here, but we have conda so we might as well use it! We also need the diffusers installed as an editable package. There is a somewhat conda equivalent with conda develop but this is deprecated and should not be used. Unless you have a ton of video ram on your GPU you also need the bitsandbytes optimization.
# make sure your prompt starts with (hdb) or the name you chose for your environment!
# assuming the repo in the first step was cloned to your home folder
cd ~/diffusers/examples/dreambooth
conda install -c conda-forge --file requirements.txt
# I couldn't find this one on conda-forge
pip install bitsandbytes

cd ~/diffusers
pip install -e .
Prepping your instance images
This should be all the dependencies we need to run the training scripts. But before we can train, we need some images for the model to be trained with. With DreamBooth it is very easy to overfit your model. Overfitting is the model becomes to rigid in the response it gives to a prompt. If I feed DreamBooth 5 images of my face all in the same lighting, with the same expression and taken at the same angle and run the training for 2000 steps, it is almost certain that any image it generates from my prompts will looks exactly like those photos. I do not mean that in the, wow look how similar this is to me way, rather I will get what looks like a poorly done photoshop of my face into any image. To avoid overfitting the model you will want to prep 10-20 images of yourself looking in different directions, with different lighting and ideally with different expressions. If you only want serious looking photos then you can opt to use the same expression in every photo, but generating a smiling image will probably be difficult.

All your photos should be 512×512 pixels and contain only your face. If you’re taking photos in the same area, try to vary the background. The goal is to give the model something to find consistent between the photos, and you want that to be your facial features and not the random fern in the background. If cropping and sizing all these photos sounds daunting, I have some great news for you. Megan Dass has created an awesome tool called Magic Crop that lets you crop and resize your photos right in the browser using client side code! You need to click “change settings” first and select 512×512 as the output, but after that you can select your images and it will spit out a selection of perfectly cropped photos! Place these photos in a ~/diffusers/examples/dreambooth/instance folder. The name instance isn’t required, but will be referenced in the next script.
Running the Training Script
With your instance photos prepped you could run the train_dreambooth.py script right from the command line, but there are a lot of options to configure and doing that is error prone. I opted to look through the examples in the readme and create a small shell script that would run the commands with all the options configured.
# Defining variables for easier adjustments
# Using SD 1.5, this will download automatically
export MODEL_NAME="runwayml/stable-diffusion-v1-5"
# Your images to train with
export INSTANCE_DIR="instance"
# The prompt to train with
export PROMPT="jeremyfry"
# The location of the model
export OUTPUT_DIR="output-model"
# Training steps, details explained in the next section
export TEXT_STEPS=200
export STEPS=1100
accelerate launch train_dreambooth.py \
--train_text_encoder \
--pretrained_model_name_or_path=$MODEL_NAME \
--instance_data_dir=$INSTANCE_DIR \
--output_dir=$OUTPUT_DIR \
--instance_prompt=$PROMPT \
--resolution=512 \
--train_batch_size=1 \
--mixed_precision="fp16" \
--gradient_accumulation_steps=1 --gradient_checkpointing \
--use_8bit_adam \
--learning_rate=1e-6 \
--lr_scheduler="linear" \
--lr_warmup_steps=0 \
--max_train_steps=$TEXT_STEPS
accelerate launch train_dreambooth.py \
--pretrained_model_name_or_path=$MODEL_NAME \
--instance_data_dir=$INSTANCE_DIR \
--output_dir=$OUTPUT_DIR \
--instance_prompt=$PROMPT \
--resolution=512 \
--train_batch_size=1 \
--mixed_precision="fp16" \
--gradient_accumulation_steps=1 --gradient_checkpointing \
--use_8bit_adam \
--learning_rate=1e-6 \
--lr_scheduler="linear" \
--lr_warmup_steps=0 \
--max_train_steps=$STEPS \
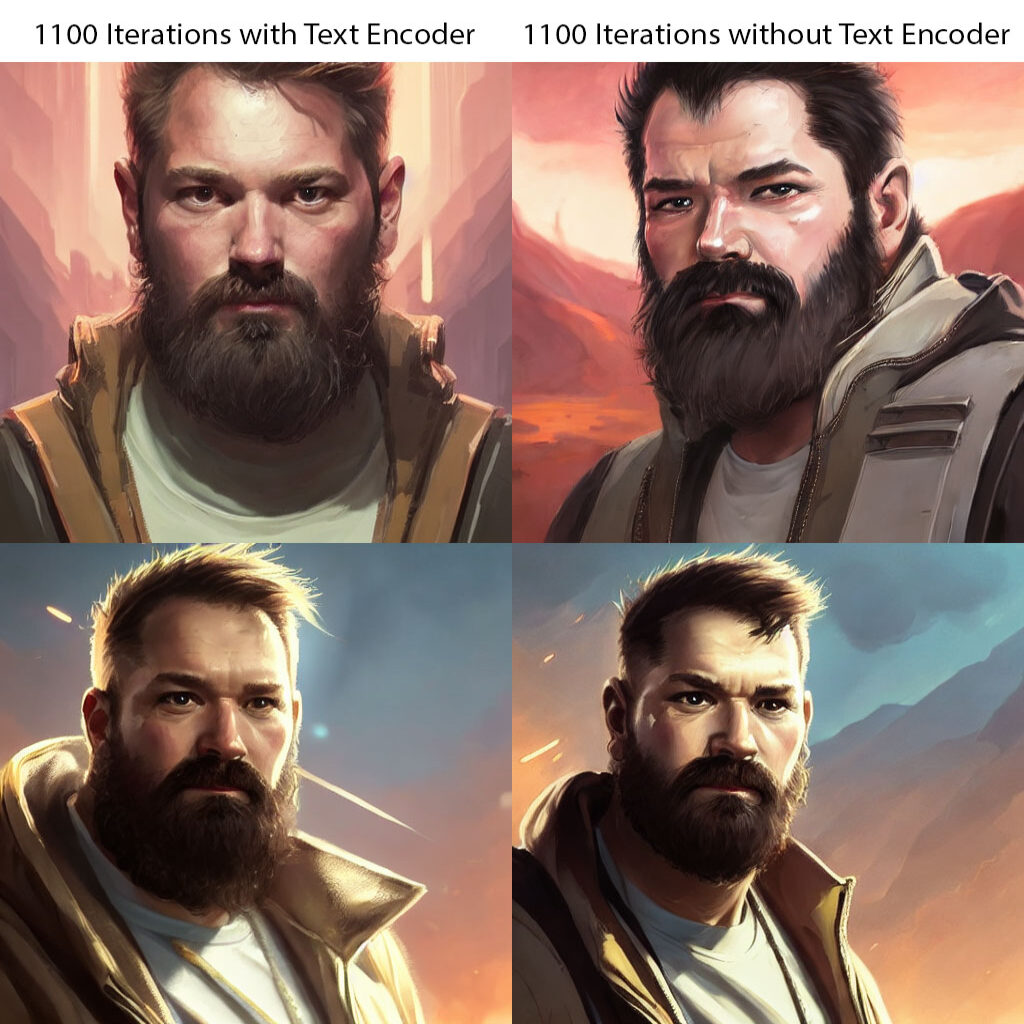
--checkpointing_steps=200Quite a lot to unpack there. The first thing you may notice is that I’m running the training twice. The first time through I’m only training the text encoder for the model. This step isn’t required, but I have had better results with training the text encoder with 200-300 steps. This is purely subjective but I’ve included an example of using the same seeds on a model that trained the text encoder and one where I only ran the second training sequence. The ones with text encoding have a strong resemblance to me especially in overall face shape. I used the same seed on below images to show the difference of training the text encoder or skipping it.
I will do a play-by-play of the options I’m using, what they do.
- train_text_encoder – Used in the first command to train the text encoder on our prompt
- pretrained_model_name_or_path – This is the model we’re training on top of. Stable diffusion in my example
- instance_data_dir – our instance training images
- output_dir – Where to save our model and checkpoints
- instance_prompt – The prompt we’ll use to train the model and generate images
- resolution – Resolution to train at. Since SD 1.x is trained on 512 images and our instance images are 512 we leave it at 512. If using SD 2, we would want to bump to 768 as well as our instance images.
- train_batch_size – How many “threads” to spin up. If like me you’re on a GPU with 16GB of VRAM anything over 1 will cause an out of memory error.
- mixed_precision – Using fp16 offer a significant computation improvement
- gradient_accumulation_steps – Keep this at 1 with our single batch size. There’s nothing to accumulate before moving to another pass.
- gradient_checkpointing – Saves memory by generating checkpoints that can be used as the starting point while training.
- checkpointing_steps – how often to save a checkpoint. This can be very helpful if you don’t know how many steps you want to train for. You can try different checkpoints to see if a specific step gives better results.
- use_8bit_adam – Memory saving Library
- learning_rate – You can change the learning rate to decrease training time, but this may cause model to not be accurate. 1e-6 and 2e-6 are common.
- lr_scheduler – The learning rate scheduler to use
- max_train_steps – The number of steps to train. You’ll need to tweak this based on your results and your training images.
That’s a very high level of the options I’m using in my script. There’s a lot of detail you can dive into on them by reading through the code in train_dreambooth.py to get an idea of how they effect the training. The big thing you’ll want to play with is the max_train_steps. Depending on the number of instance images you have you’ll need to tweak this too. I use a minimum of 500 steps and then adding 100 steps for each image over 10, roughly (instance images-10)*100+500. Your result will vary based on how unique the images are. If you want to try different levels of training you can always use the resume_from_checkpoint option to pass in a checkpoint folder and pick up the training from there!
Generating a Test Image
There’s a lot of ways you can generate an image using your model, I’m going to use a small Python script that generates a series of 10 images using a manual seed. Using the manual seed allows me to see the results I get with each of the checkpoints and decide if I need to do more training or if I’m happy with the results.
from diffusers import StableDiffusionPipeline
import torch
import sys

# output-model is based on the output directory in the previous script
model_id = "output-model"
# This prompt is borrowed from an image on Civitai that I have reworked. If you want images like mine, just replace jeremyfry with your prompt.
prompt = "portrait of jeremyfry, concept art, artstation trending, lifelike, photorealistic, illustration, sci-fi, fire and galaxies in the background, art by wlop, greg rutkowski"
fname = "image"

# safety_checker=None prevents NSFW detection. I found it a little overzealous at times, but if you want to  be careful to reduce your chance of seeing something NSFW then remove it
pipe = StableDiffusionPipeline.from_pretrained(model_id, torch_dtype=torch.float16, safety_checker=None).to("cuda")

# you can remove the manual_seed to use a random seed. I've used a fixed seed to test different levels of training on my models.
generator = torch.Generator(device="cuda").manual_seed(5500)
# simple loop to generate 10 images and save them. The generator will iterate each loop
# inference steps defines how many times the image should be refined
# guidance (1-10) determines how rigidly the model should interpret your prompt.
for x in range(10):
    image = pipe(prompt,
        generator=generator,
        negative_prompt="disfigured, cropped",
        num_inference_steps=25, guidance_scale=7
    ).images[0]
    image.save(f'generated/{fname}-{x}.png')
Another option is to use Automatic1111 GUI to test out your prompts, but to do that you need to generate a checkpoint file. I’ve used this script by jsksxs360 that takes an output from the training script and generates a ckpt file that you can copy to the models/stablediffusion folder if you want to use that UI.
Tweaking Your Results
Now that all the building blocks in place you can start refining your results. Training a stable diffusion model to convergence is a strange balance. If you don’t train with enough steps you get some likeness, but not enough to really feel like it’s an image of yourself. If you go too far, you will either get exact copies of your photo, or if your instance images had enough variety, you will get this crushed effect on your generated image. Here are examples of the same set of instance images trained for varying numbers of steps.
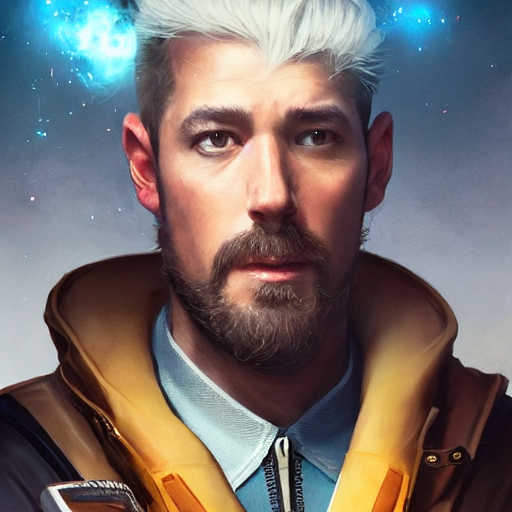
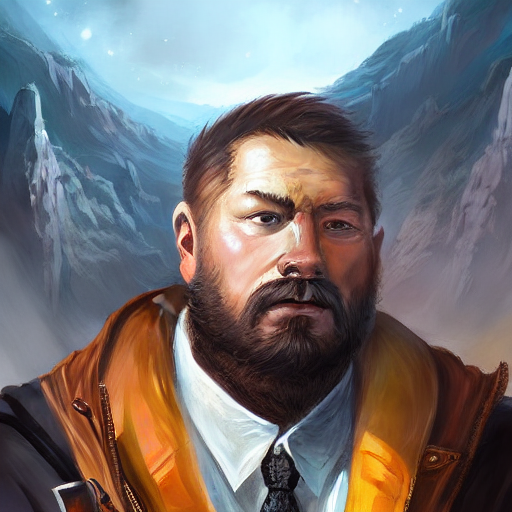
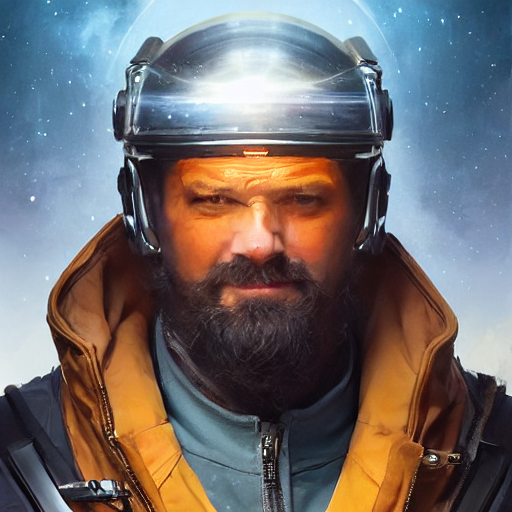
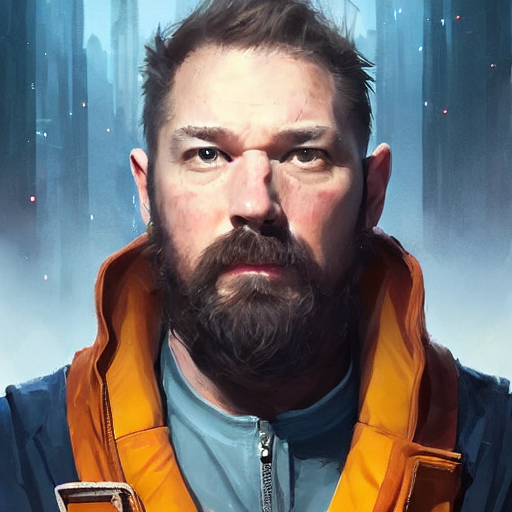
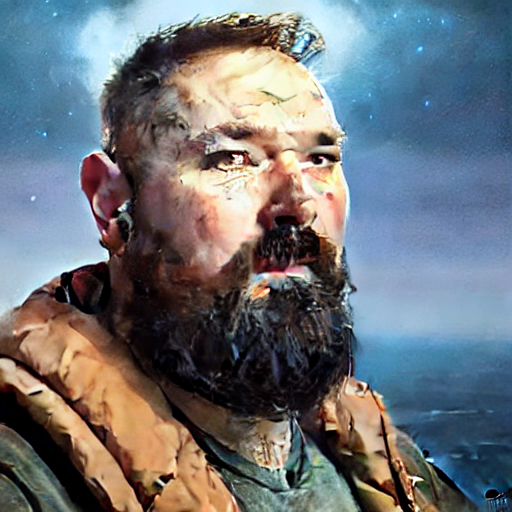
You can see that at 400 steps there is some likeness creeping in. Surprisingly, this photo resembles my brother more than myself! At 600 steps my features are there, but there is not enough training points to make the image look decent. When I trained the model for 800 steps we’re getting pretty close and despite the random helmet obscuring the face, you can tell the proportions are getting close. When continuing on to 1100 steps, I’m satisfied that the resulting images are looking like me with enough data to start playing with prompts. If I were to train the model to 2000 steps, the image gets distorted and has a crunched feeling to it. The sweet spot for my images is somewhere between 900-1200 steps. Keep in mind that your instance images may have more or less variety than mine and will require some tweaking to get right.
Next Steps
Now that you can train a diffusion model, there’s no reason to rely on the stable diffusion model itself. There are plenty of models that have certain stylistic attributes to them you can train yourself or other objects into. Civitai (NSFW, there’s a lot of 18+ models, but default blurs them) has a huge selection of SD models you can download and experiment with. DreamShaper is my favorite for generating fantasy art like the wizard post you saw in Part 1. Generating images that contain your likeness but in a full scene is a difficult challenge. In the coming weeks I’ll be posting my workflow for generating a larger image with a high level of detail, so be sure to check back for the next post!